Focus Blending Takes Quantum Leap — New Helicon Focus Versions
Update: July 2, 2009: As of late June, a version has been created which does run in 10.5 on PPC, so a release should be imminent. Please refer to Mark Dubovoy's new article on Luminous-Landscape.com about Helicon Focus, which acknowledges a small part of the work I did on Helicon Focus and comes to the conclusion that "Now that the 64-bit version of the software is available, I can say that at least with Canon 1Ds MKIII, P45+ and P65+ files the Helicon Focus software is a total success." Article here.
Update: May 12, 2009: Version 4.1 and a newer beta both break in the new OS 10.5.7, becoming totally unusable. If you are already reliant on Helicon Focus, do not update your OS to 10.5.7 yet! Hopefully this will be fixed very quickly. Version 4.0.5 does not break in 10.5.7.
Update: April 17, 2009: Version 4.1 is released and allows 64-bit processing on the Mac, with access to far larger amounts of memory. System 10.5 and later only. For System 10.4 users, version 4.0.5 is released, with many improvements, including a free upgrade to multi-processor support for holders of the more inexpensive licenses, but further development of the 32-bit line will cease. My testing of both versions indicates they are both quite solid, and on a new Mac Pro, the 64-bit version can be many times faster with larger images than the 32-bit versions on a PPC Mac, depending on the task, and also makes it possible to complete the processing of larger images, such as a stack of four, 48-bit, 39 MP source files, or a stack of two, 48-bit 64 MP source files, and presumably much larger tasks as well.
First some background: I used a 4x5 and relied on tilts and small apertures for adequate depth of field for 35 years. But the imperative to capture digitally, recently led me on a more-than-two-year quest for a new camera system and the system wound up being one without significant tilt capability. Even if it had been one of the beautiful new bellows-free view cameras built for digital capture (the ARCA-SWISS Rm3D, the various Alpa's, the Sinar arTec, or the Linhof Techno, among others), especially one of those with tilt capability for all lenses (Rm3D, arTec and Techno), I would still have wanted to possess a robust capability for focus blending to achieve more depth of field.
As most photographers will appreciate, there are times when the subject matter makes a tilt ideal for getting the required depth of field or focal plane placement (e.g. the flat surface of moving water) and times when the subject makes a focus-blending approach work better (e.g. looking through a forest of tree trunks ranging from very near to far).
Be that as it may, I required the best software for focus blending that I could get for my new system to do what I need it to do. Helicon Focus (pronounced like pelican, but ending in -con) has long been the best application for this purpose on the Macintosh, but it still had major weaknesses and the Mac OS development of the product lagged pretty far behind the Windows development. For some time, the primary creator of Helicon Focus, Danylo Kozub of HeliconSoft in Ukraine, had been planning to get the Mac version caught up to the Windows version, and he let me know late last fall that he had arranged with a Mac development team in Ukraine to get that work done. I couldn't wait. At last, Helicon Focus should be gaining the vital capability to retouch blending errors due mainly to subject movement between frames -- a vital issue for working outdoors. If this capability and other details of the blending process are implemented just right, focus blending can be counted on as a reliable mechanism for routine problem solving for the highest quality outdoor photography, as well as a variety of other kinds of photography.
So in early December I volunteered my services as a beta tester of the new Mac version 4, and over the ensuing four months I became not only the principle outside tester but also a driving force toward a long list of improvements, which have been (happily for all concerned) implemented faithfully by Danylo and his Mac OS team.
The new version is something we are all proud of. Although at the moment, there are still a few odds and ends that one might describe as rough around the edges, the product has, I think, reached a level of capability which will be hard to improve upon, with the caveat that a 64-bit version is due out perhaps as soon as next month, April, 2009, which will greatly increase the maximum file sizes which can be processed -- to sizes sufficient to handle, for example, 60 MP captures or larger, which cannot now be processed, and while maintaining good processing speed if your machine has RAM well beyond 5 GB. The Windows version already has two options for more RAM capability.
Here is the Parameters (Blending) tab of the completely re-designed interface, shrunk to fit a web page:
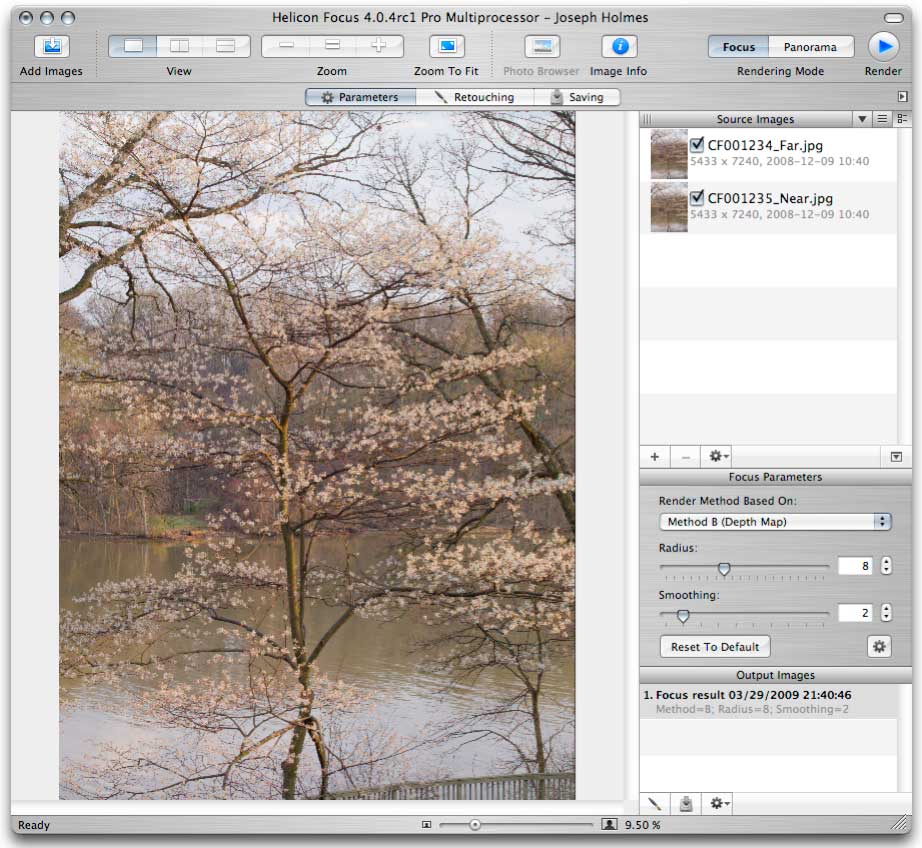
The biggest advance in Mac version 4 is the ability to enter the new Retouching tab, and to brush from any of the scaled source images into the rendered output image. Among the many improvements to this process that I urged and helped to realize were the ability to use much larger brushes and the ability to see the "depth map" (similar to a mask) while brushing, so as to know which portions of any given source image are included in the output image at any given time. I'm sure that this was a great deal of work for the programmers to accomplish.
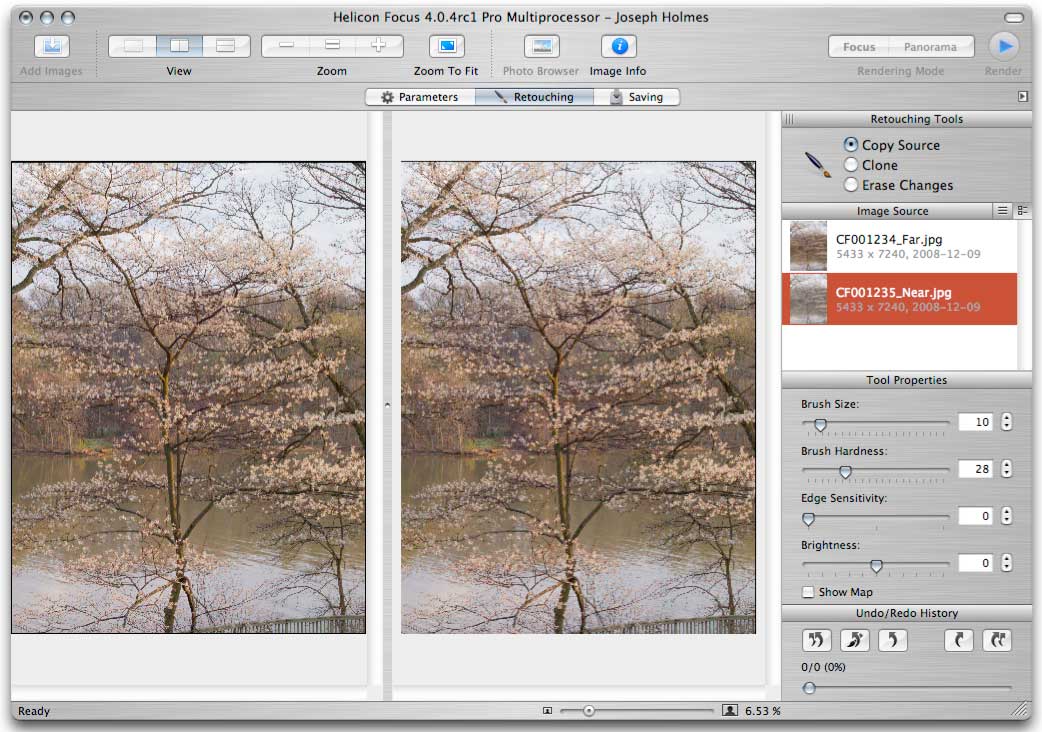
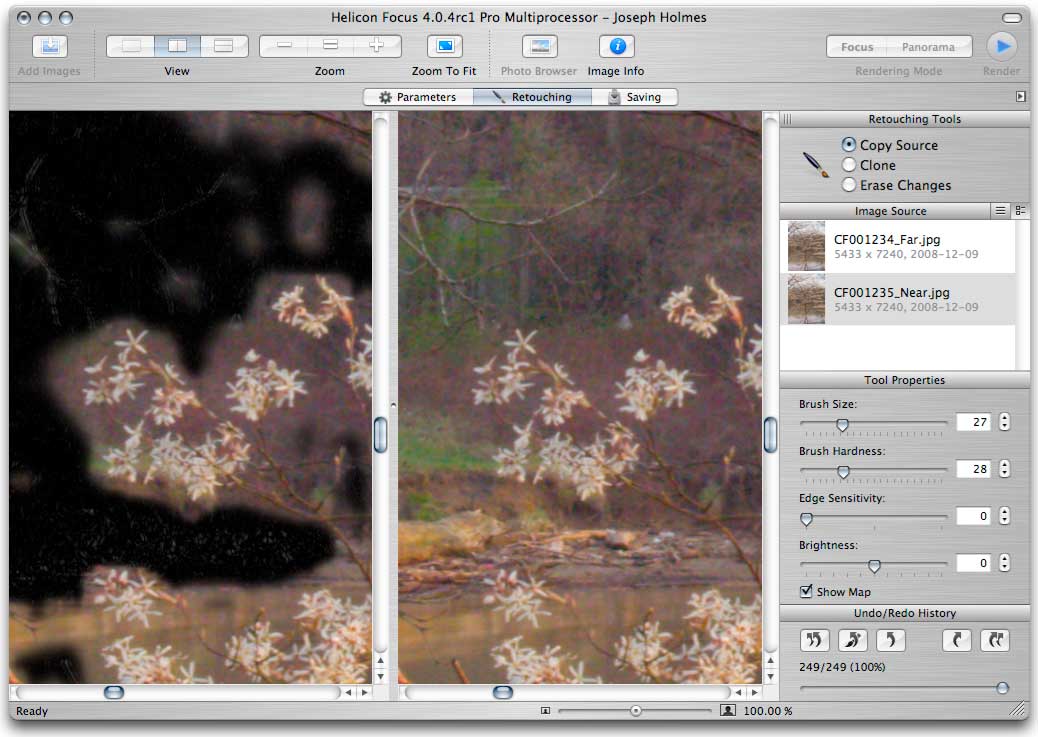
Here is Retouching mode with the narrower-angle source image on the left, and the unretouched output image on the right. Notice the narrow black band around the source image, which is indicative of the minor change in the angle of view from refocussing the lens. This is the test image I used the most and was quite good for evaluating certain kinds of challenges that one might encounter working outdoors, at some distance, including slight vegetation movement, grossly moving waves, shifting pale clouds, high-contrast edges, and minimal focus differences.
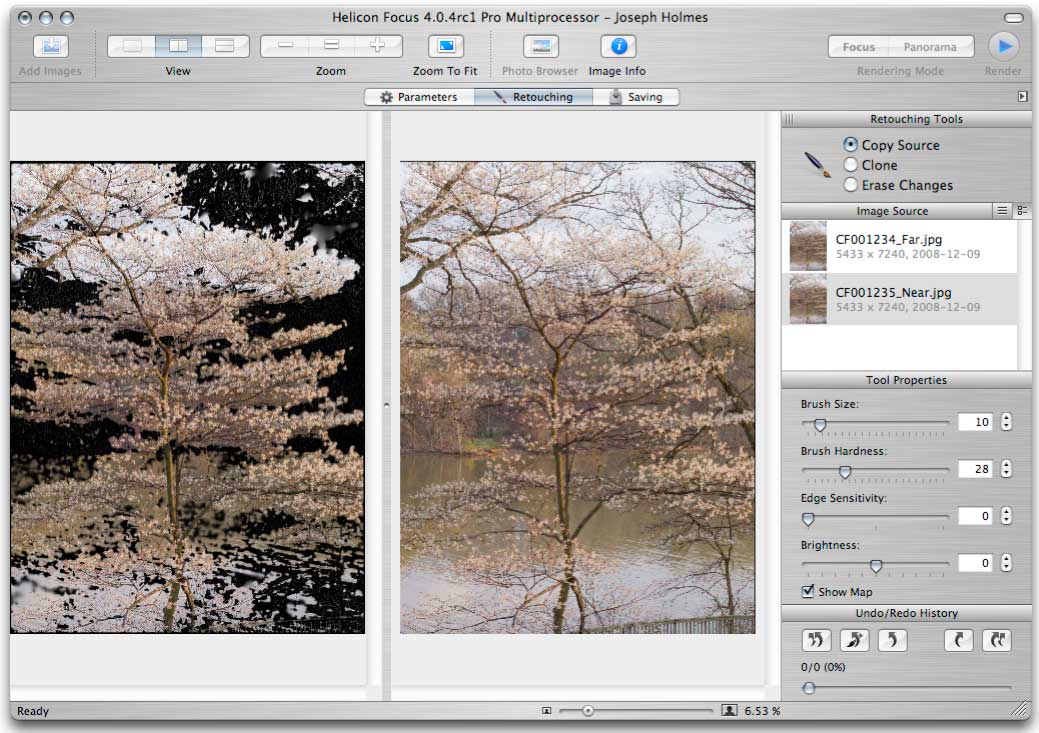
The depth map for each source image is updated in real time in response to brushing, and the map can be shown or hidden at any time in the Retouching tab with a checkbox.
Here is the Near depth map after a few minutes of retouching which easily solved any problems with the water movement:

I have also strongly urged the inclusion of numerous Photoshop keyboard shortcuts for scaling, panning, scrolling, changing brush sizes, etc., so that the process of moving around within the images can be comfortable and fast. In this respect, the current state of the program is just about complete.
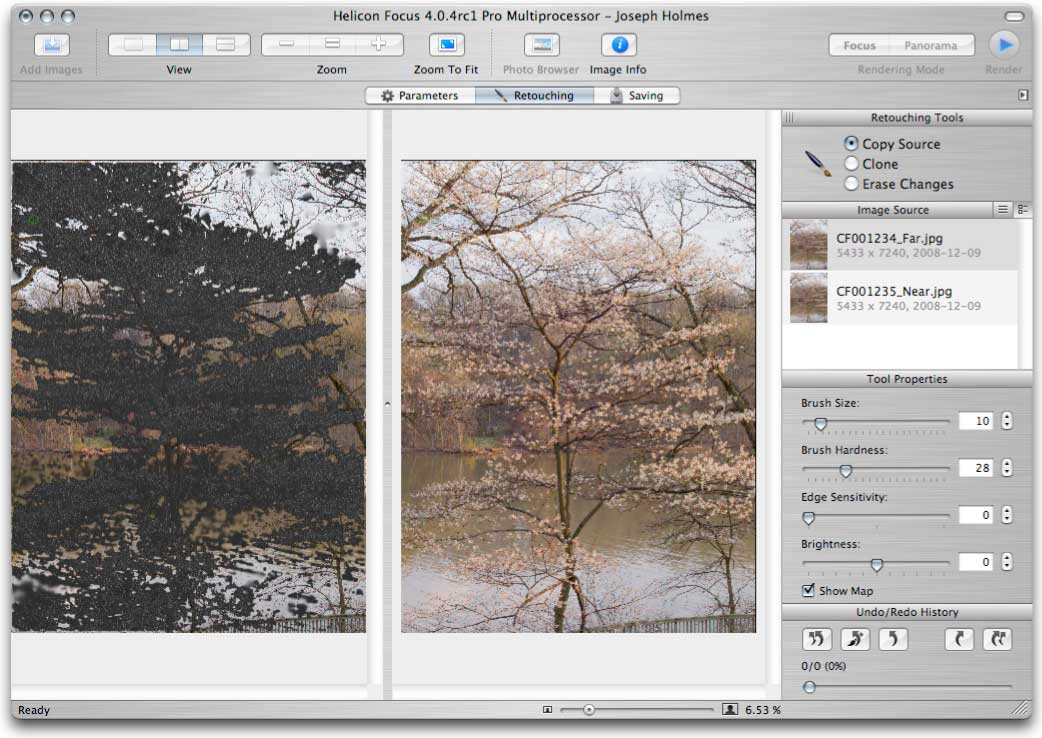
Finally, for reference, here is the image zoomed in to 100%, showing the feathering of the map edges and some image detail. An actual rendering of this image other than for this testing will be far sharper than this, but will not appear to have been sharpened, and when it is finished, the stitched image should be well over 80 million pixels.
The brushes remain quite slow on my dual G5 PPC machine, but may be subject to further optimization, and will, I hope, speed up a lot when I switch soon to a pair of Nehalem Quads too. The higher-priced versions of the program are multi-processor aware.
We have managed to preserve the ability of the user to determine which source image's outer boundary will become the outer boundary of the rendered output image. When you make two or more exposures at different focussing distances, each resulting frame has a different outer edge. Whether the closer focus image has a narrower field of view or a wider one depends on the type of lens in use -- my new Mamiya zoom lenses (and yes, they really are as sharp as prime lenses, as Mamiya says) work backwards, inasmuch as focussing closer makes the field of view wider.
In the first tab of the program, the Parameters tab (which I hope to see re-named as the Blending tab), the Source images are added to a list by opening them in an Open dialog or by drag and drop. The sequence of images in that list controls how they are blended. The top image defines the outer edge of the output image. The sequence of images when they are added also conforms to the sequence in the Mac Finder when you add them. For example, if you are in Column view in OS X, the files will be in alphabetical order and that's what you'll get when you add them to Helicon Focus (H.F. for short). But if you use List view in the Open dialog, and sort in a different way than the file name, or if you reverse the sort order, then that's how they will open in H.F. Also, whichever way you do open them, the sort order can be reversed in H.F. by clicking the tiny black triangle ("twirlie") at the top of the Source Images region of the interface.
So, if you put the narrowest-angle-of-view image at the top of the list, your output image will be automatically cropped to that image. That image will not be interpolated, and the remainder will. Conversely, if you put the widest at the top, you will get the most image in terms of angle of view, but the same output pixel dimensions. The widest angle image will remain uninterpolated and the rest will shrink to align with it for the blending process. This latter method has the advantage of giving you a little more image around the edges, but the disadvantage that the outer boundary area is necessarily not properly focus blended, because the application doesn't have all the images to work with out there. Because this may work out OK, quality-wise, especially with a little retouching after the fact, we wanted to be sure that you could have the extra small margin of image if you needed it!
Note that the fact that the Source image list sequence controls the rendered result is not yet documented in the app itself, so do make sure you understood the prior three paragraphs.
Getting this to work right was a big job. Initially the outer region well inside of the border zone between the narrowest-angle image and the outer edge of the widest-angle image was also not blending correctly, but I was, without any great effort, able to prevail upon Dan's good graces to engineer the fix to this old bug, and now both ways are working essentially as well as possible. Do think though, about the importance of doing your composition with the focussing distance set so as to get the narrowest angle of view, so you don't have trouble with running a little short of image around the edge.
Another major improvement to the quality available in Helicon Focus came from our exploration of alternate methods of interpolation. Anytime you change the pixel dimensions of an image file, you are faced with a problem, but there are actually a quite large number of interpolation methods available, some of which produce far less sharpness degradation than bicubic, for example.
After a long period of experimentation, I am extremely pleased with what the clever Dr. Kozub has settled on giving us: four methods, each good representatives of important positions on the spectrum of interpolation speed versus quality. At the low end of quality (and the high end of speed) is the original Bilinear method, which is indeed fast but which causes obvious degradation of sharpness of the interpolated source images, if they were sharp to begin with and one takes a careful look. This was the only method used in Helicon Focus, before I turned Dan on to the entire topic of superior methods and argued successfully that the whole point of focus blending is to get better sharpness -- so anything which works against that in the program is potentially taking a big step to the rear.
The new default method is Bicubic, which is better, and a little slower, but still causes some visible blurring of image detail.
Next comes the considerably slower Lanczos 3 math, which does a really good job of preserving image detail, at the cost of causing some ringing artifacts here and there, which are most likely to be seen in smooth areas around the edges of the frame. For the most part, images will not require retouching to lessen these lines which form like waves parallel to contrasty edges.
Finally, my favorite type of image interpolation, Lanczos 8 (also called Sinc 256) produces interpolated results which are exceeding close to perfect in sharpness preservation, albeit with even more ringing artifacts, which may require retouching in at least some parts of an image's edges (e.g. in skies). It is indeed much slower to compute, having a kernel size of 16 x 16 pixels. Lanczos 3 has a 6 x 6 kernel. I think the bilinear is 2x2, and bicubic 4x4. The processing speed is roughly proportional to the area of the square.
By offering the user four major levels of image interpolation, ranging from the lowest quality that one could use to the highest, the product has, I think, hit the perfect balance in this area. It has made it possible for the product to essentially not degrade the image in order to carry out the interpolation portion of the process (needed to align the various source images prior to the actual focus blending), while preserving the option for high speed when the photographer doesn't care or when a series of tests need to be run.
I might mention that at least one implementation of Lanczos interpolation that I have seen elsewhere incorporated sharpening, so that the interpolated result actually was sharper than the original, but I think it's better to leave all sharpening out and handle that at other stages.
The next major area that I did a lot of kibitzing in was the focus blending algorithm itself. Helicon Focus has most often been used in the past for blending microscopic and macro images exposed at very close or extremely close range. The demands of imaging are different in extreme close-up work, as the depth of field is indeed extremely small with optical systems (in contrast to scanning electron microscopes!). When a series of pictures is made which includes very close objects in front of very far objects, or to put it another way, when there are edges which need to be blended where the difference in focus is extreme, this presents a challenge which can be impossible to solve, however some tweaks to the blending process can favor better results in these cases. It is much easier to blend a series of images of a flat surface together than a set of images which contains something very close in front of something very far. In the latter case, the best results are likely to obtain from stopping down relatively far and using correspondingly fewer exposures to make the set.
The thing that bothered me about the results which were given was that any given region within the image was likely to have some information from one frame and some from another, resulting in sharpness degradation. Exactly how this is handled and how feathering is done is very complicated and can be done a great many different ways, but now I believe that the results obtainable in H.F. can be optimized quite well, so as to prevent image blurring due to slight subject movement between frames (as will often happen when photographing vegetation, even in near-calm conditions). Again, the whole purpose of this undertaking is to improve image detail, so a blending process which took it away by not generally giving output results which are all from one source image for the vast majority of the area of the image (or at least not making that possible with the lower amounts of Smoothing which the user can set) would be highly undesirable, and that situation is now completely fixed, to my way of thinking.
I should mention that despite the sharpest optics with fine sensors tending to be in the f/8 range on the plane of focus, and despite it being easy enough to see the effects of diffraction with apertures as large as f/11 or even f/8 (and the increases in diffraction in turn becoming considerable in proportion to image detail at each smaller aperture, I have found that with the best sharpening methods, even f/22 can give extremely sharp results, almost identical to f/8, after processing. Under circumstances such as one encounters out of doors working with medium format equipment with wind and changing light, if I can make a capture with a single frame without going beyond f/16 or f/22 (perhaps f/20), then I will usually prefer that, but if the subject matter favors it, I might also use a pair or trio of exposures at f/11 to f/14 to cover the same range of distances.
The circumstances which I do and will encounter in my work will result in me most often using f/11 to f/22 for making two-shot image sets per frame (per camera orientation) when I do need to use focus blending. I also often stitch, so that can mean a near and a far shot for each of several vertical frames, made with my Phase One P45+. The final result would tend to be on the order of 100 Million razor-sharp pixels -- the image detail equivalent of something like 6 x 12 inches of modern color film at its very best, but the depth of field of a 35 mm camera. Or more, if more frames were made, but more than two in a stitch situation would be pretty hard to pull off out of doors.
Andre Oldani, one of the three ALPAs, made a wonderful example of focus blending which was being shown in the FotoCare booth at PhotoPlus Expo in NYC in October, 2008. He used six frames with a 72 mm Schneider Apo-Digitar at f/8 to photograph an industrial scene which went from about one meter to over 20 meters, I am guessing, with a 33 MP Leaf back. The 24 x 32" print looked like modern 8 x 10 in detail, but had the depth of field of a half-frame 35 mm camera! It was a revelation to see, even though I had long known what focus blending could do for us. It was produced with an older version of Helicon Focus, and I was nevertheless unable to see a single rendering imperfection in the image. It was one of those pictures you see once in a while which enlarges the envelope of what is possible in photography in a significant way. Of course the color quality was stunning as well, which is par for the course with digital capture with a good eye. I must assume that were Andre to re-do the process with the current version and optimal settings, the result would look even better (i.e as good in a somewhat larger print).
So, now, when I test Helicon Focus on my very tough main test image, instead of the blended result being, in significant regions of the image, less sharp than either source image, it is pretty much what I would hope for, i.e. the output image is as sharp in each region as the sharpest region in either of the two source images.
My test image is single portion of a pano of a group of lacy bare trees, made with two exposures, each at between f/16 and f/18 with my Mamiya 105 - 210 zoom set to about 115 mm. The subject matter goes from 45 feet to over a quarter mile. The two frames are so similar to one another that in many regions it is very tough to see which frame is the sharpest. A single frame would be nearly enough, but I would have to stop down to a degree that I was a little uncomfortable about in this case, though that's how I did most of the attempts I made at this subject. The trees all moved a tiny amount between frames, as the wind was nearly but not perfectly calm. Perhaps the toughest thing is that the foreground trees, which extend from 45 feet to over 200 feet, have a large body of water behind them, complete with waves on the surface. Inevitably, the moving waves create confusion in the software which requires retouching after the rendering/blending process. The retouching is now relatively quick and easy, however. The important thing is that the software correctly and automatically discerns which portions of the image should be taken from each source image, and then selects them pretty much fully (with my favorite settings, e.g. try B/8/2 in the Parameters/Blending tab) from one image or the other, and uses a good feather radius where each edge within the depth map occurs (edges being the transition from one source image to another).
This feather radius can also be reduced from its default setting of 10 in the H.F. Preferences, right down to zero. This feature is another thing that I asked for, after seeing that it could improve the results in some cases to make transitions sharper, but it's kept out of the way in Prefs, in order not to compel most-likely-unnecessary experimentation beyond that already afforded by the Method pop-up (A or B -- choose B!) and the Radius and Smoothing sliders. I advise that you run a series of experiments with the interpolation in Prefs set to Bilinear (to make it fast), while you vary the Radius and Smoothing sliders and learn how they behave. To see what happens, after you have a rendered Output image, switch to the Retouching tab and take a look at the depth maps of the source images so you can see how the maps turn out differently as you change the slider settings.
No single setup can cover all the different kinds of images, so having these two slider controls is very important for quality. Still, I may tend to stick with my favorite settings for most of my own images. I can't tell you with certainty what settings those are now, because I haven't again determined them since the last changes to the mapping/blending algorithm, but try B/8/2 anyway.
The behavior of the zooming functions was greatly improved at my urging. H.F. now has four methods to zoom in or out:
1) Command-Plus and Command-Minus keyboard shortcuts, per Photoshop standard (as well as Command-Option-Zero for go to 100% and Command-Zero for fit to screen).
2) Click Zoom Plus and Zoom Minus symbols at the top of the H.F. interface window.
3) Select Zoom In or Zoom Out in the View menu.
4) Use the slider beneath the lower right corner of the image window to smoothly zoom to any magnification between 5% and 1000%, fast.
As you zoom with the keyboard, the progression of zoom levels is a very nice one, albeit with still too many levels of zoom at the small end of the scale, between 5% and 25%.
They also added the excellent Photoshop-style keyboard shortcuts for not only scrolling up and down (page up and page down keys, but the ones for scrolling sideways: Command + Page Up and Command + Page Down. I love to be able to move around large images quickly and easily and any imaging application should offer all of these controls to minimize the time and effort needed. And the Home and End keys work too.
I even got the guys to add the brush size change shortcuts: [ and ], though at the moment, those are Command - [ and Command - ]. I expect that will change to the standard any day now. This lets you keep your eyes on the brush as you change the size to what you want.
The current version is 4.0.4 and I am guessing, barring any major bug discoveries, that this version will be posted soon to replace version 4.0.3, which has a significant bug that we have since fixed.
I assume that many if not all of these suggested and implemented improvements will be or have been added to the Windows version as well. It has been most gratifying to work with Danylo and his other engineers at d-STUDIO, Ltd. and to get to see, over the last 17 weeks of nearly daily work, Helicon Focus becoming a polished and highly capable focus blending tool which I feel confident I can rely on to provide top-notch quality with a minimum of retouching effort, despite my fussy quality demands. I hope the rest of you enjoy it too. Be sure to poke around the image interface to find the little controls that allow you to place images either side-by-side or one above the other, and which allow you to show or hide the parameters and tools windows within the Parameters/Blending and Retouching tabs.
Helicon Focus will process and save out 16-bit TIFFs and PSDs both, and will keep the embedded ICC profile intact as well.
H.F. does not use its own system of scratch memory, relying on a normal 4 GB system memory allotment in the current 32-bit versions, so it tends to crash when you do things that take too much memory. Again, that memory ceiling will change shortly on the Mac, I am assuming for OS 10.5 and later, but I don't know yet whether 10.4 will be supported for 64-bit memory addressing (which allows potentially vast amounts of RAM to be utilized). Soon we'll be in 10.6, where 64-bit will be fully implemented in the OS (albeit with backward compatibility for 32-bit code, except for device drivers). There are already two Windows 64-bit solutions which allow for either 3 GB more or vastly more RAM to be used, respectively. Check out their web site for details on that: http://www.heliconsoft.com/heliconfocus.html.
I should mention that one of the things that H.F. can do is to align images for focus blending which were made with modest shifts in the optical axis. In other words, if you are careful, you can even make focus blending sets hand-held, assuming you are not too close to the subject. And it works. But you should not let your camera re-aim by more than maybe 2 to 3% of the width of your frame or the resulting edge artifacts may require more retouching than you would like. Still, try it! Even with a 39 MP back, it is sometimes feasible to do top-quality work hand-held. If there is a lot of light and the subject matter is moving very fast, it can be worth keeping in mind that it's actually possible to shoot hand-held with such a device. Not that lots of photographers don't -- but they don't for landscape work. In 35 years of using a Linhof, I never once shot hand-held. It seems like sacrilege to even think of such a thing! :-) Seriously, with a camera like the new Canon 5D II, it has gotten a whole lot easier to hand-hold with no camera movement, or to put it another way, the envelope has been greatly increased from the old days. Or maybe I should say hugely increased, since the new CMOS cameras are so very fast and the latest image stabilization lenses claim 4 stops worth. Speed hasn't gained so much compared to film with the Phase One backs and their slower but sharper CCDs (more dynamic range too).
Also -- H.F. can do a kind of stitching. Not the kind that one does by pointing the camera in multiple directions to make multiple, overlapping frames. Rather the kind that is analogous to taking a series of aerial photos of the ground from a moving airplane, but which was intended, I gather, primarily for assembling multiple exposures made with a microscope, where the slide is moved between exposures. I have not tested it!
There's a lot more that one could say about various details of the all-new Mac interface, and all of the fun bug-hunting that we've done, but I've covered the main points of what's new and done all the bragging I can about how I helped (which is a big part of my reward, since I might otherwise never engender nor enjoy any of your infinite gratitude for having ensured that you too can now have a much better focus blending solution! :-)
I hope you dig it. It is, I suspect, the first arguably mature form of a tool which makes possible a whole new way of working with cameras, even when the subject matter is challenging due to movement.
And thank you Dan!